
How to set up an online shopping cart 
Autor: Incomedia
Introduction
It's time to deal with a crucial part of our sample Tees X5 Store (http://tees.websitex5.com ): now that we've set out our project and started to create the pages for it, we can start setting up the online shopping cart.
In last month's T&T (http://answers.websitex5.com/post/24689 ) we looked at how to create the product catalogue, and the next logical step is to create the online shopping cart: we're going to go back into the pages that present the T-shirts and this time we're going to add the “Buy now” button.
Product catalogue
The first thing to do when setting up an online shopping cart is to create the product catalogue, which is a list of all the products for sale in our online store, with all the necessary information on each one.
This is how we do it:
- Go to Step 4 – Advanced Settings and click on Shopping Cart.
- We'll be working in the Products section and we'll use the New category button to add our three new categories, “Girls”, “Guys” and “Kids”.
- We'll start by selecting the “Girls” category: click on the New Product button to open the Product Settings window where we can add all the information that is needed for our product (in this case, a girl's T-shirt).
Now we'll create a product for the “X5 Wonderland” T-shirt (http://tees.websitex5.com/x5-wonderland.html ):
- In the General section of the Product Settings window we enter the Name/Code of the product (“X5 Wonderland”), the description (“Girl's White V-neck”) and the price (“22.00”). To set the page as Product Linked Page, we click on the
 button and select the “X5 Wonderland” page from the SiteMap. We don't have to specify the VAT amount for a single product, as we'll do this later for the whole shopping cart. We don't have to specify the Weight either because we're not going to have discounts related to the total weight of each order.
 - In the Image section of the Product Settings window, we can add pictures of our product, in this case the X5 Wonderland T-shirt. We can also set the size of the ShowBox window where an enlarged view of each picture can be displayed. This image/Gallery will appear in the product presentation card that we will create using the Product List Object.
- In the Options section of the Product Settings window, we can create the list of Product Variations just by typing them in. In this case, the only variation is the size of the T-shirt.
If we select the Enable Quantity Discount option and click on the Add button, we can specify that orders for 5 or more X5 Wonderland T-shirts will be automatically discounted by 10%.
- Now we confirm everything we've done and the “X5 Wonderland” T-shirt appears in the “Girls” category.
- We have to repeat these steps for each T-shirt that we want to add to each of the various categories in our product catalogue.
NOTE: The entry for Product Variation combines colour and size because, with children's T-shirts for example, both parameters may vary. We can create variations that contemplate the most useful parameters for each item: the Product Variation for the “Keyboard” T-shirt, for example, doesn't include colour but instead proposes long or short sleeves. When deciding what to write in the Product Variation field, bear in mind that this will appear in the product description in the store's page.
Shipping and payment methods
Once we've created our catalogue, we have to decide on the shipping and payment methods that we intend offering our customers.
We have chosen mail and express delivery as the shipping methods for our T-shirt store:
- If we open the Payment section of the Shopping Cart we'll see that both shipping methods already appear in the Shipping Method List. If we want to offer any other shipping methods, we can do so by clicking on the Add button.
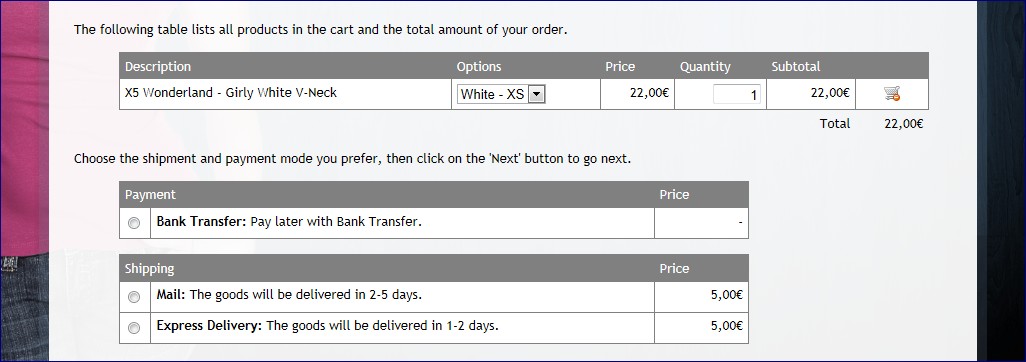
- Double-click on “Mail” to open the Shipping Method window. Now we can define the Name and Description of this shipping method in the General section. The text in these two fields must be clear and concise because, as you can see in the figure above, it is used in the store's order window where the customer has to choose the preferred method.
- In the Costs section of the Shipping Method window we can specify a Fixed Cost, a Cost related tototal order value or a Cost related to total order weight. For our Tees X5 store, we've chosen the second option and specified that a shipping charge of €5 will be applied to orders under €100, and for orders over €100 shipping is free.
- Finally, in the E-mail Message section of this window, we've written a brief description of the chosen method: this text is important because it will be included, along with other information, in the order confirmation e-mail that is sent to the customer.
We have chosen Bank Transfer as the payment method. The procedure for selecting payment methods is the same as for shipping methods.
You can choose to offer Pay later (by bank transfer, for example) or Pay now (by credit card or PayPal, for example) options in the Type section of the Payment Method window. If you choose the Pay now option , remember that you will have to enter certain parameters, such as your account number, according to the service you will be using.
Whichever type of payment method you decide on, you can specify a Fixed Cost.
Order form
We set up the order form and order confirmation e-mail in the Customer Details section of the Shopping Cart.
To set up our order form, all we have to do is tick the fields we want to include from the list of those available. We can also indicate which of the fields we have chosen are to be mandatory.
It's a good idea to use the Show Agreement Conditions option and write a clear and concise paragraph explaining the conditions of use of your online store.
In the Order List E-mail, all we have to do is indicate the e-mail address to which customer orders are to be sent. We can also choose to use the Attach Order Data in CSV Format, which is useful for collecting all the order details in a single file that can be used by an accounting and order management program.
The last thing to do is write the Header Text and Footer Text of the Order Confirmation E-mail.
Options
The Shopping Cart's Options section includes parameters such as accepted currencies, VAT, the appearance of the product tables and that of the shopping cart's Add/Remove buttons.
Remember that you can also select the Allow Orders only for Minimum Amounts option, which means that orders for less than a specified value will not be accepted.
The Buy now button
Now that we've set up our shopping cart, we can go back to Step 3 and complete our pages with the Buy Now buttons. We're going to do this for the page dedicated to our “X5 Wonderland” T-shirt.
- Select the “X5 Wonderland” page from the Sitemap and double-click on it to edit it.
- Select the Image Object for the Buy Now button (it's inserted in row 5, columns 9 – 12 – see our T&T at http://answers.websitex5.com/post/24689 ) and double-click again to edit it.
- Now click on the
 button to open the Links window: here we have to select the Add to cart option. Select Add product directly to cart and then select “X5 Wonderland” from the catalogue tree. You can also set default values for Variation and Quantity.
 - Confirm the changes and have a look at the Preview: the “Buy now” button is working and customers viewing our page will be able to place their orders for the “X5 Wonderland” T-shirt!
You repeat this procedure for all the T-shirts in the “Girls” section: the pictures in these four pages give size availability, and the only active button is “Buy now”.
The product cards
Once we have set up the shopping cart, we can use the Product List Object to create the actual catalogue pages where the customer can place orders.
In our T-shirt store, we've used the Product List Object to create a sort of cover page for each section : Girls, Guys and Kids.
- We select the “What's New” page in the SiteMap (it's right under the “Girls” separator), and we double-click on it so that we can edit it.
- Once we've set out the page layout as shown in the figure below, we can start working on the Product List Object inserted in row 3.

- In the List section of the Product List Object you can see that we've got the Product and Category List that we added to our shopping cart catalogue: so now we tick the “Easy Fast & Professional”, “My Lovely Granny”, “The Lively Gramps” and “X5 Wonderland” products. These 4 T-shirts are shown in the second list that displays the contents of the Product List Object. We have selected the 4 products, and not the “Girls” category, because we want the Product List Object to show only these 4 products, and not all the others that may be added in the future to the “Girls” category.
- To decide the order in which the products will appear in the Product List, we click on the Order button and select Custom. Now we can use the Move Up and Move Down buttons to put the products in the order we want.
- Now, in the Settings section of the Product List Object we set “image and Text” as the Display Type, and we can work on the settings and layout of the product presentation cards.
- Finally, we have to confirm our settings and check our work in the Preview: we've now got a page that shows the four T-shirts, gives all the necessary information for each one and has the buttons so that customers can buy them, and the links for viewing the pages of each single article.
Conclusion
In next month's T&T we'll be talking again about the shopping cart and we'll see how to let customers choose T-shirt sizes in the “Guys” section, and how create a special “Add to cart” button for the T-shirts in the “Kids” section.
As usual, to make it easier to follow the explanations in this T&T, you can download the updated project file from here: http://bit.ly/I6ABZn
Once you've imported the .iwzip file, you can look through all the various parts of the project, including the shopping cart, that we've talked about so far.
Hello, i have a question. In the order form:
To set up our order form, all we have to do is tick the fields we want to include from the list of those available. We can also indicate which of the fields we have chosen are to be mandatory.
I need a field called "DATE", the reasson is because I sell Tours, and i need to know the date they want to do the activity.
Is it possible to add a new fiel, or change the name of an existing one ????
Thank you !